How to Make a Cute Easter HOP Cookie Set


My Essential Cookie Tools for Cookie Decorating


My Essential Cookie Tools for Baking Cookies


My Essential Baking Tools for Royal Icing


Essential Decorating Tools for Royal Icing

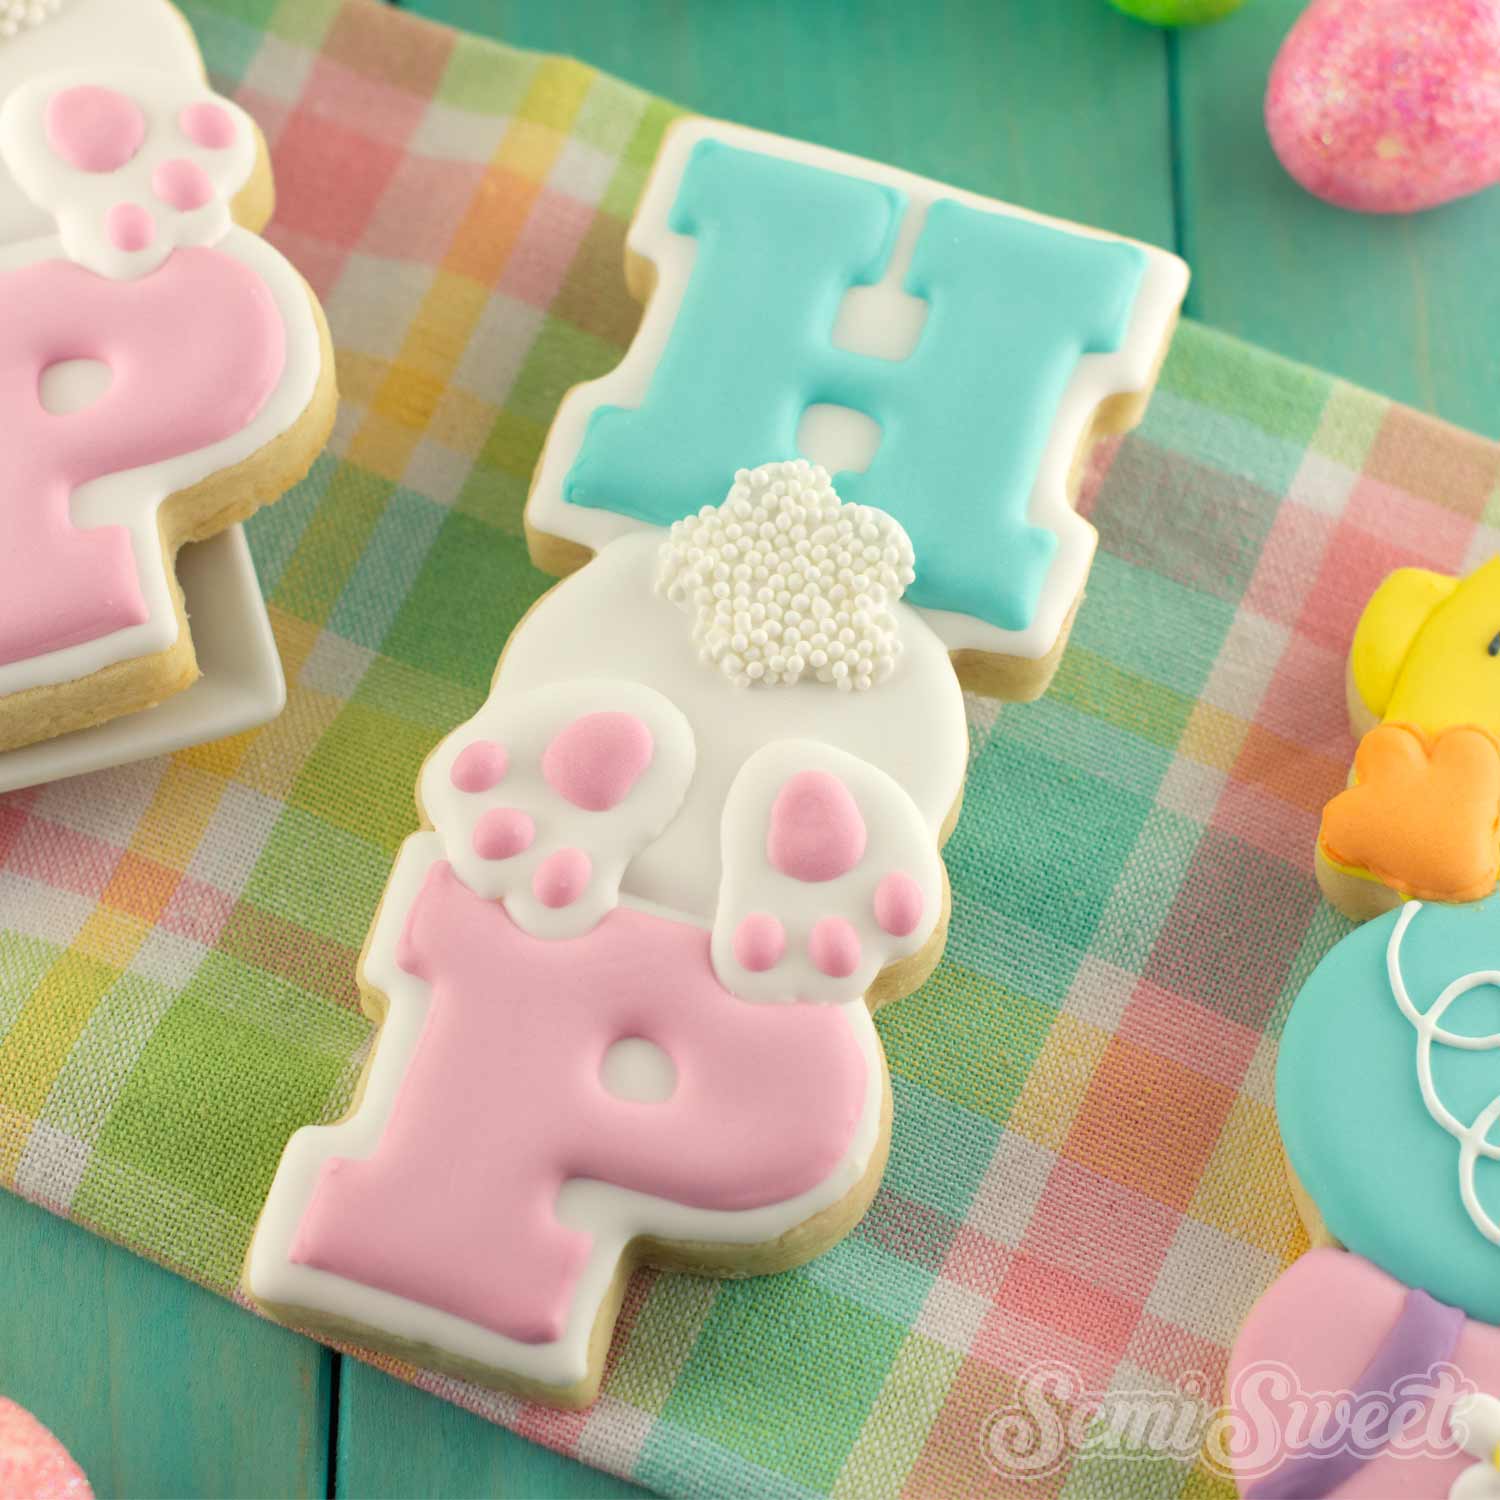
When a cookie design involves multiple cookies, my rule of thumb is to "keep it simple." This new HOP cookie cutter set does just that.
The letters H and P are straight-forward in design, but I applied an easy airbrush treatment to give them more added interest. The middle bunny booty cookie is also very beginner-friendly. There aren't too many steps to completing this set. In addition, it requires only 3 different colors of icing (including white), which is always a nice bonus in my book.
Here's how you can recreate this 3-piece Easter set for yourself.
Easter HOP Cookie Cutter Set
Just added to the shop for the upcoming Easter season is this HOP cookie cutter set.
The cookie cutters are available in various sizes. However, for this tutorial, I'll be decorating the REGULAR size.

Templates for the Easter HOP Cookie Set
To help with the decorating process, I made a PDF template available for all the new Easter spring cookie cutter designs, including this HOP cookie set.
You can download these cookie templates HERE.
If you have a Kopykake or Pico projector, just print it out (or pull it up on your mobile device) and you are good to go. For those without a projector, follow the suggested steps below by tracing the design onto the cookie with an edible food marker.
The Cookie Decorating Process
For the colors used for this HOP cookie set, you will need the following suggested colors:
- Teal royal icing (I mixed equal parts Americolor Teal and Americolor Sky Blue.)
- White (I used Americolor Bright White.)
- Pink icing (I used Rainbow Dust Pink.)
Step 1
For the bunny booty middle cookie, start by flooding the entire cookie with white icing. Let that icing set up (about an hour).
Then add another layer of white icing for the feet sections. This will give the feet more dimension.

Step 2
Next add the pink foot pads on both feet.
Then fill in the cotton tail area with white icing, and immediately add nonpareil sprinkles over the icing for texture.

Step 3
For the letter pieces, begin by applying a thin layer of white icing over the parts where there is empty space, as shown. I used a flexible spatula for this step.
Let the icing set up (about an hour).

Step 4
Next, outline and fill in the letter area with colored icing. Let this icing completely dry before moving to the next step.

Step 4
Finally, for added interest, I decided to airbrush a polka dot pattern on the cover. I used Americolor GEL color in white for the airbrush color. (Check out this post to see how I airbrush white color with great coverage.)
The white airbrush color doesn't really show up on the white icing of the middle spaces.

Easter HOP Cookie Set Video Tutorial
The steps above are summarized in this time-lapsed video I put together below.
Here's the completed set of the three cookies.
These are the REGULAR size cookies and the fit nicely in this BRP long cookie box (12″ x 5″ x 1.5″).

The middle bunny booty design is also the same design in this 4-piece Hoppy Easter set.
It's on my list to decorate next. So stay tuned if you'd like to see those decorated cookies in the coming days!

With a little imagination, you can create beautiful displays, heart warming, edible gifts and much more starting with simple cookie cutter ideas. What do you want to create today?
Add Vibrant Colors with Americolor Food Coloring

To make your decorated cookies pop, use Americolor Food Coloring for bold, consistent colors. It’s my go-to brand for achieving vibrant shades without altering the consistency of the royal icing.
Buy NowTags:
You may also like...


Mike Tamplin
Hi, I’m Mike, the cookie decorator behind Semi Sweet Designs! Since 2011, I’ve been sharing recipes, tips, and tutorials to help beginners gain confidence and give experts fresh inspiration. Along with my brother, Billy, we design and offer hundreds of cookie cutters, stencils, and apparel—all made with decorators in mind.
Whether you're just starting or a seasoned pro, we’re here to make cookie decorating easier and more fun!
Read more


