How to Decorate a Grim Reaper Cookie for Halloween
Learn how to decorate a spooky Grim Reaper cookie with royal icing using this easy step-by-step Halloween cookie tutorial.


Looking for a spooky Halloween cookie that’s still fun and approachable to decorate? In this tutorial, I’ll show you step by step how to decorate a Grim Reaper cookie with royal icing, complete with a hooded skull face and classic creepy details. This Halloween cookie design looks impressive but is surprisingly easy to recreate with a few simple piping techniques.
You can find the Grim Reaper cookie cutter in our shop, along with a free downloadable template to help guide your decorating. Whether you’re putting together a Halloween cookie set, making treats for a party, or just looking for a fun spooky-season project, this Grim Reaper is a great design to add to your lineup.
My Essential Cookie Tools for Cookie Decorating


My Essential Cookie Tools for Baking Cookies


My Essential Baking Tools for Royal Icing


Essential Decorating Tools for Royal Icing

Halloween Grim Reaper Cookie Cutters
Just added to the shop for the upcoming Halloween season is this Grim Reaper & Tombstone Plaque cookie cutter set. You can purchase it as a 2-piece set or as individual pieces.
The Large and Regular size set will fit in this 4.5" x 7.5" x 0.75" clear cookie box.
For this tutorial, I'm decorating the Large size option.

Template for the Halloween Grim Reaper Cookies
To help with the decorating process, I made a PDF template of all the designs of this year's Halloween collection, including this Halloween grim reaper cookie set.
Click the link below for the downloadable template PDF file.
This file is rather large in data size. Just a warning, it might take a moment before the file opens in your browser.
If you have a Kopykake or Pico projector, just print it out (or pull it up on your mobile device) and you are good to go. For those without a projector, follow the suggested steps below by tracing the design onto the cookie with an edible food marker.
Step-By-Step Cookie Decorating Guide
Decorating cookies always starts with a good royal icing recipe. This is my easy royal icing recipe for decorating sugar cookies that I always use.
For the colors used for these grim reaper cookies, you will need the following suggested colors:
- White icing (I used Americolor Bright White.)
- Black icing (I used Americolor Super Black.)
- Dark Purple icing (I mixed equal parts Americolor Regal Purple with Americolor Super Black.)
- Light Purple icing (I mixed a little of the Dark Purple icing above with fresh white icing.)
- Burnt Orange icing (I mixed AmeriColor Orange and Americolor Chocolate Brown.)
Step 1
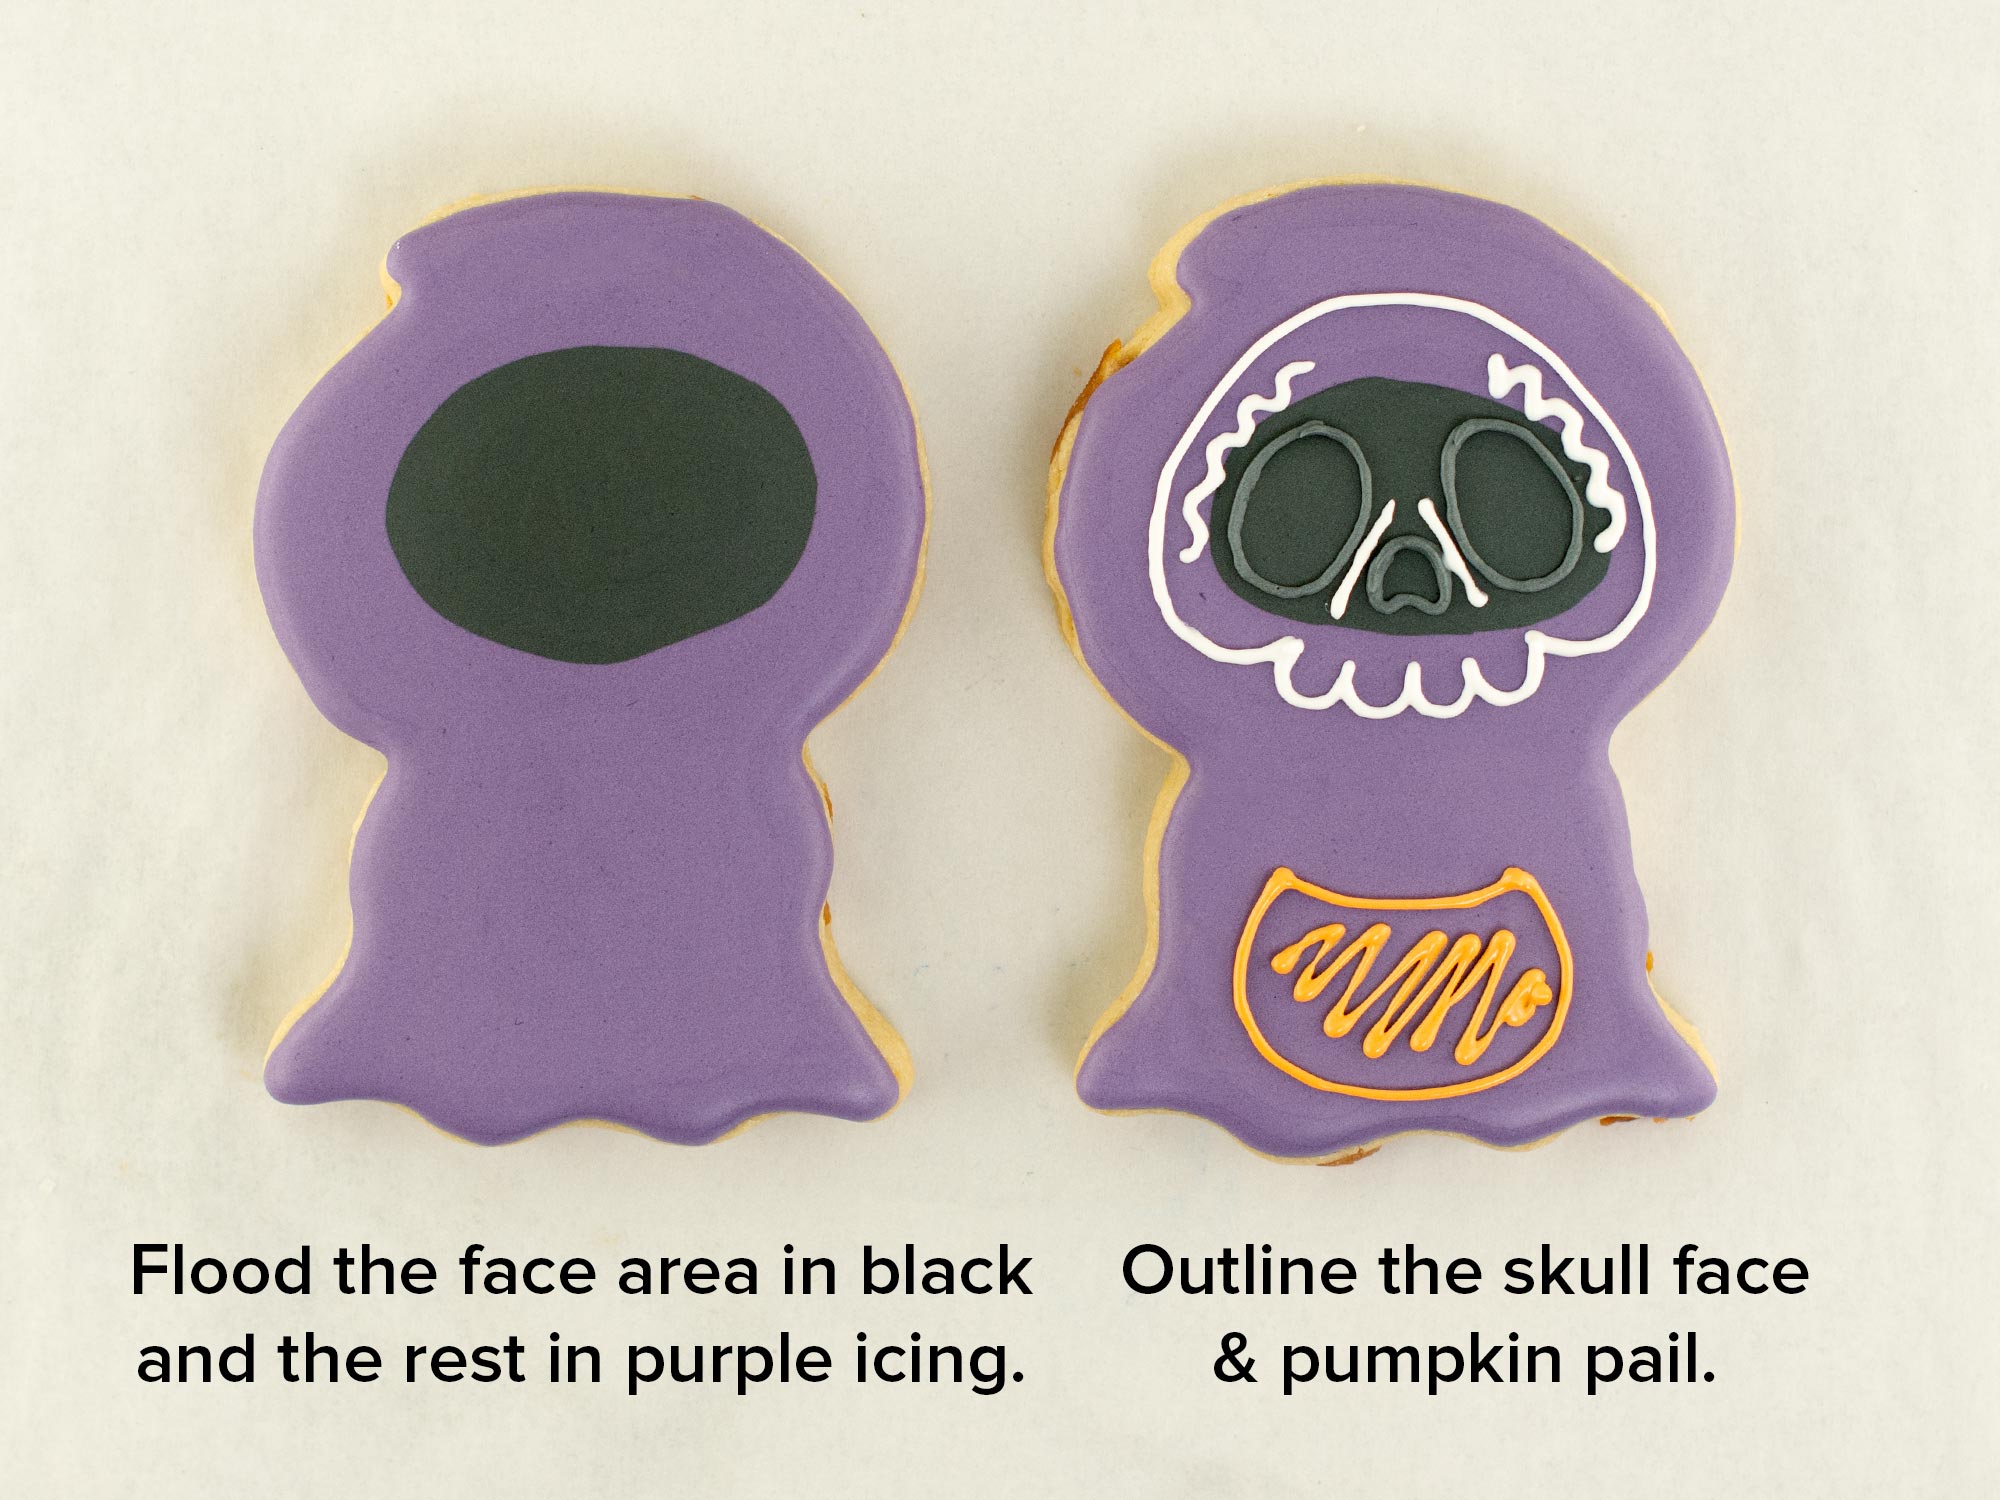
Begin by flooding the middle face area, where the eyes and nose would be, in black icing. Then immediately flood the remaining cookie area in dark purple icing. Shake the cookie to smooth the icing surface. Let this icing dry for about an hour.
Next, outline the eye holes and nose hole in black icing, outline the skull in white icing, and outline the pumpkin pail in burnt orange icing. I added squiggle lines to help prevent any cratering, as shown. (I used a cookie projector, to get the placement of these lines easily.)
Step 2
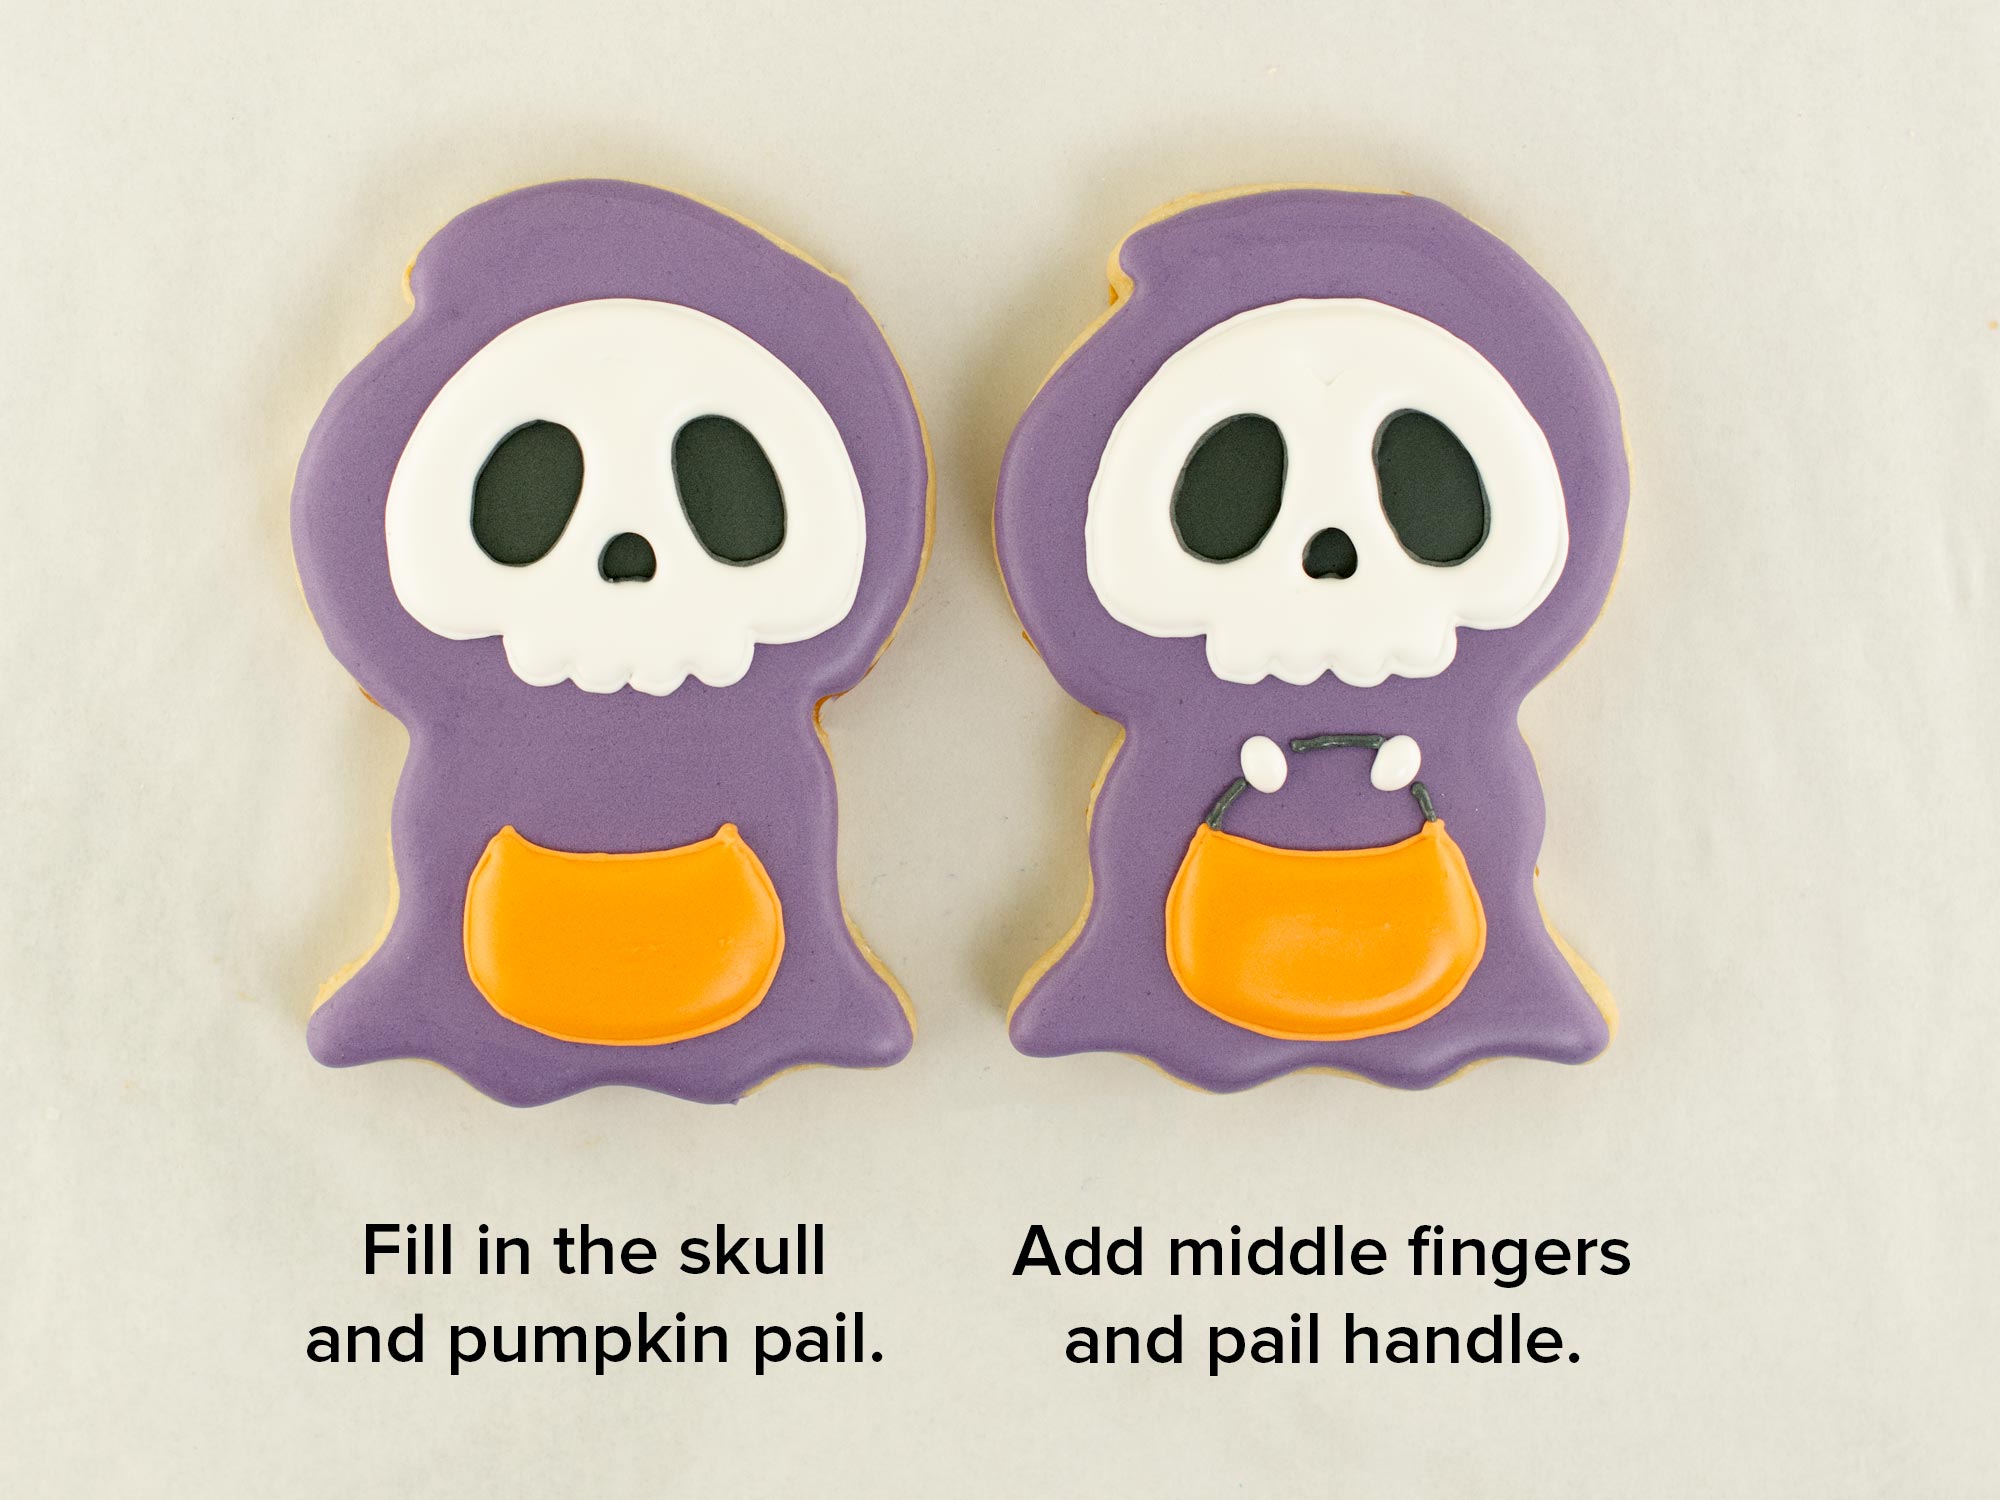
Next, fill in the inside of the skull area around the eyes and nose holes with white icing. Also, fill in the pumpkin pail section with burnt orange icing.
Then add the middle fingers and the lines for the pail handle, as shown.
Step 3
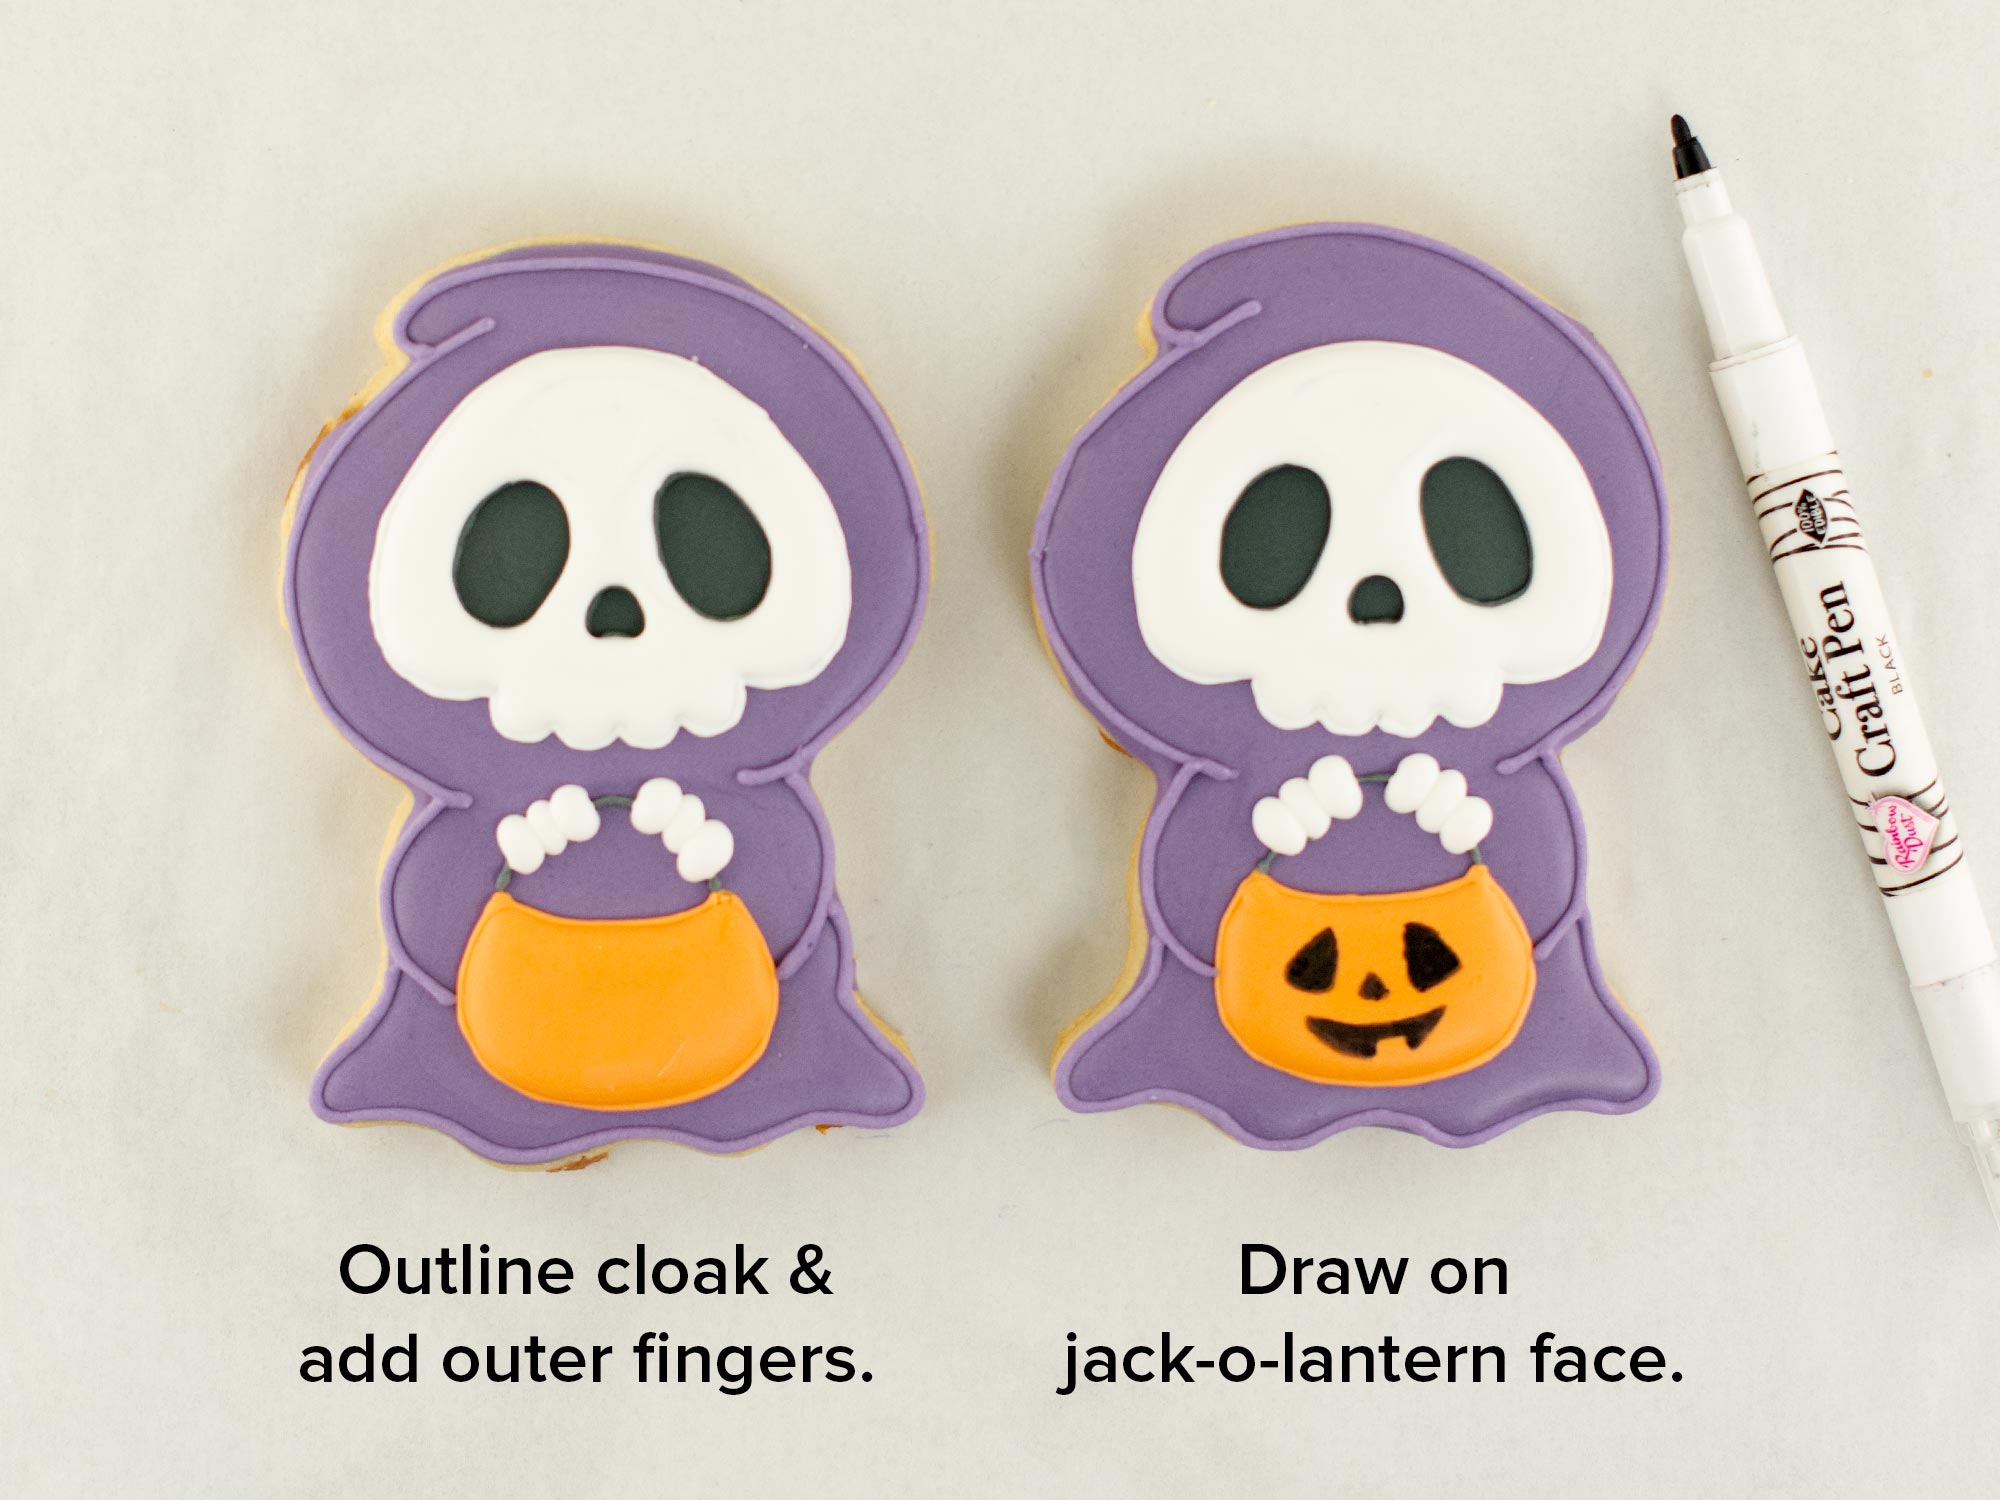
Outline the cloak in purple icing, as shown. Add the outside fingers around the middle finger.
Once the pumpkin pail's icing is completely dry, draw on a jack-o-lantern face with a food marker.
Grim Reaper Cookie Decorating Video Tutorial
The steps above are summarized in this time-lapsed video I put together below.
Once your Grim Reaper cookies are decorated and completely dry, a little Halloween packaging can make them look even more polished and gift-ready.
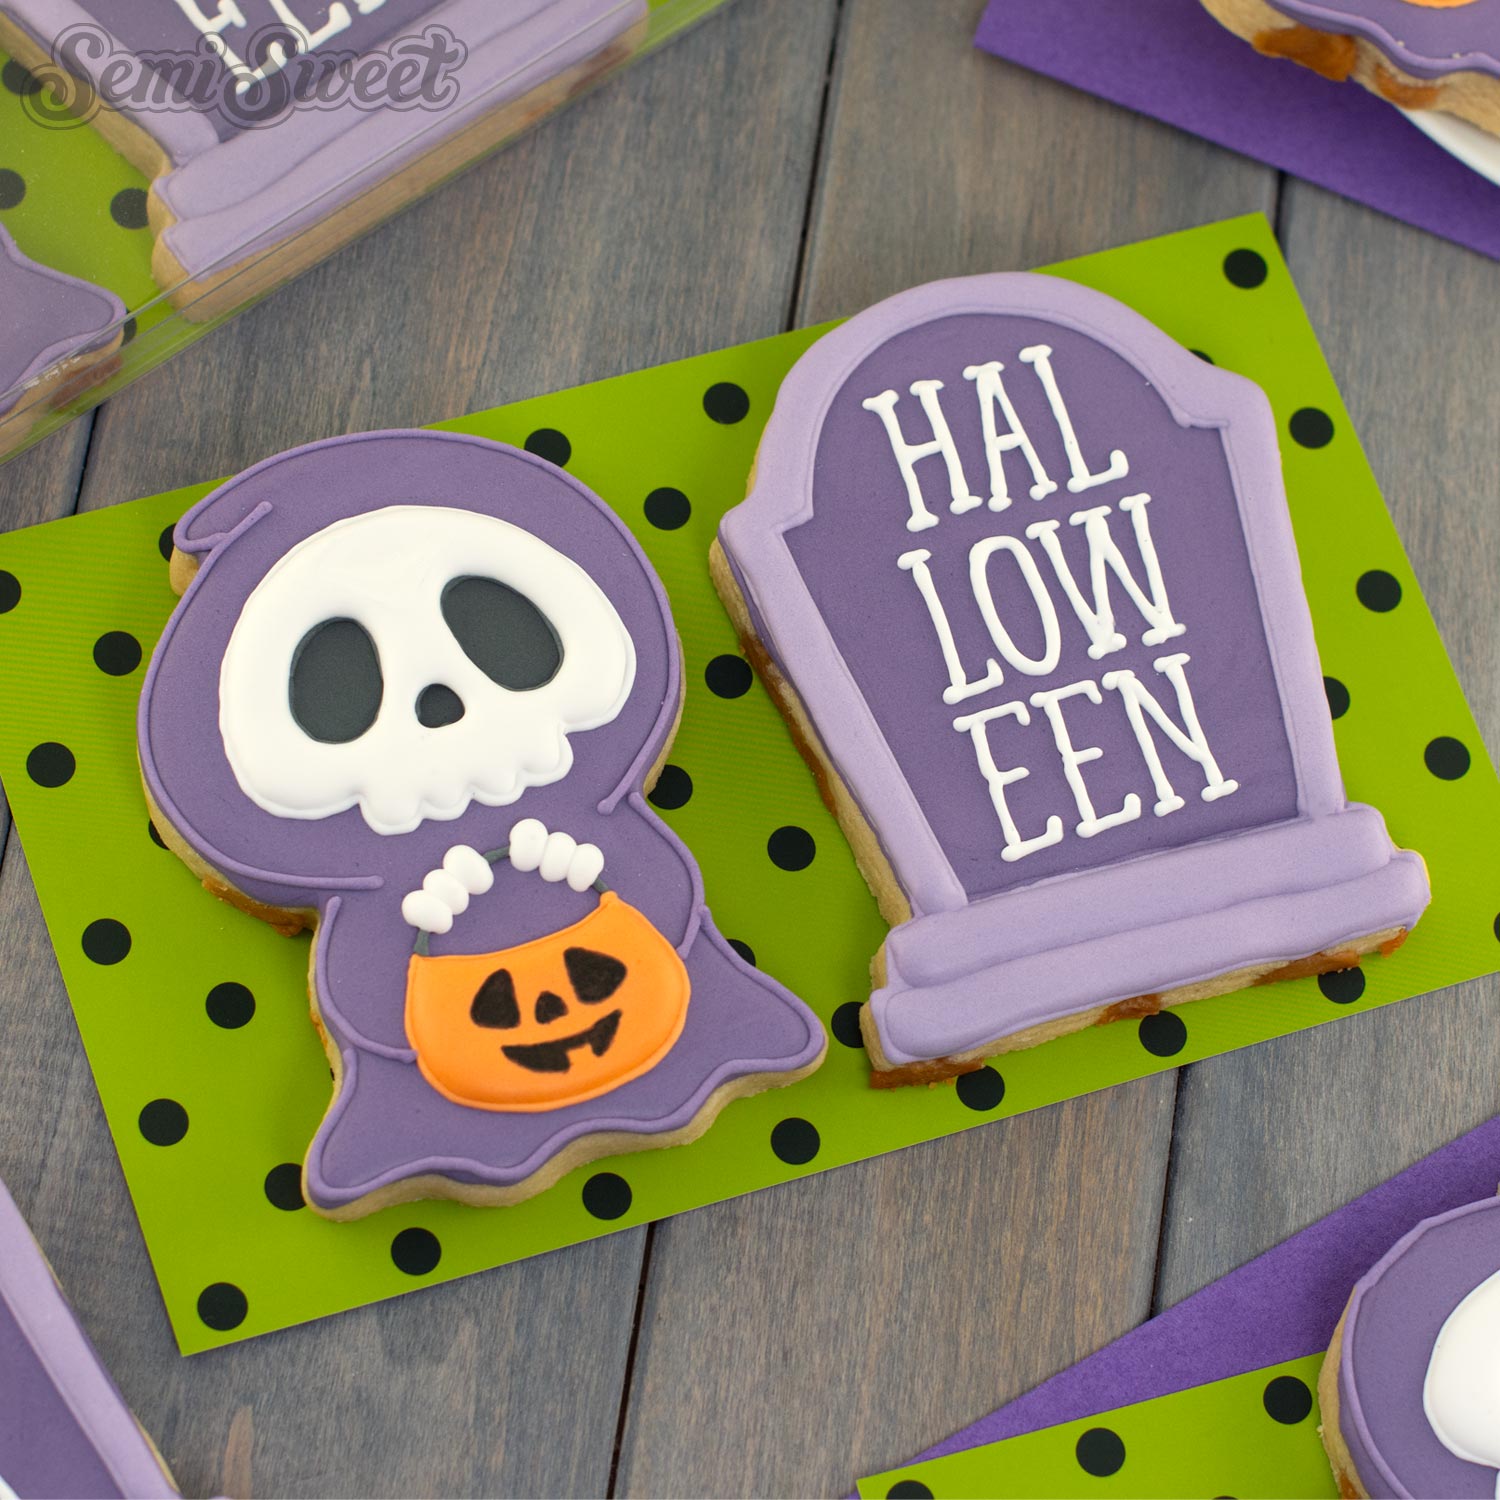
These cookies fit nicely inside a 4.5" x 7.5" x 0.75" clear cookie box, which gives you a full view of the decorated design while keeping the cookie protected. I added a green dot cookie backer inside the box for a fun pop of color behind the darker Grim Reaper design. The bright green creates a playful Halloween contrast and helps all of those spooky royal icing details stand out through the clear lid. It’s an easy packaging combination for Halloween gifts, party favors, or cookies you’re preparing to sell.

I hope you have fun bringing this little Grim Reaper to life with royal icing! It’s a spooky Halloween cookie with just the right amount of creepy charm, and it’s a fun design to mix and match with other Halloween favorites. If you’re looking for even more ideas for your next Halloween cookie set, be sure to visit our cookie cutter shop to browse our collection of Halloween cookie cutters. You’ll find plenty of spooky, cute, and creative designs to keep you decorating all season long!
Add Vibrant Colors with Americolor Food Coloring

To make your decorated cookies pop, use Americolor Food Coloring for bold, consistent colors. It’s my go-to brand for achieving vibrant shades without altering the consistency of the royal icing.
Buy NowTags:
You may also like...


Mike Tamplin
Hi, I’m Mike, the cookie decorator behind Semi Sweet Designs! Since 2011, I’ve been sharing recipes, tips, and tutorials to help beginners gain confidence and give experts fresh inspiration. Along with my brother, Billy, we design and offer hundreds of cookie cutters, stencils, and apparel—all made with decorators in mind.
Whether you're just starting or a seasoned pro, we’re here to make cookie decorating easier and more fun!
Read more