Decorate a Toucan Hibiscus Cookie Platter for Summer
This cookie tutorial will show you how to decorate a summer-themed cookie platter featuring a toucan, hibiscus flower, and a “Hello Summer” message cookie. You’ll learn step-by-step how to bring each design to life using royal icing.

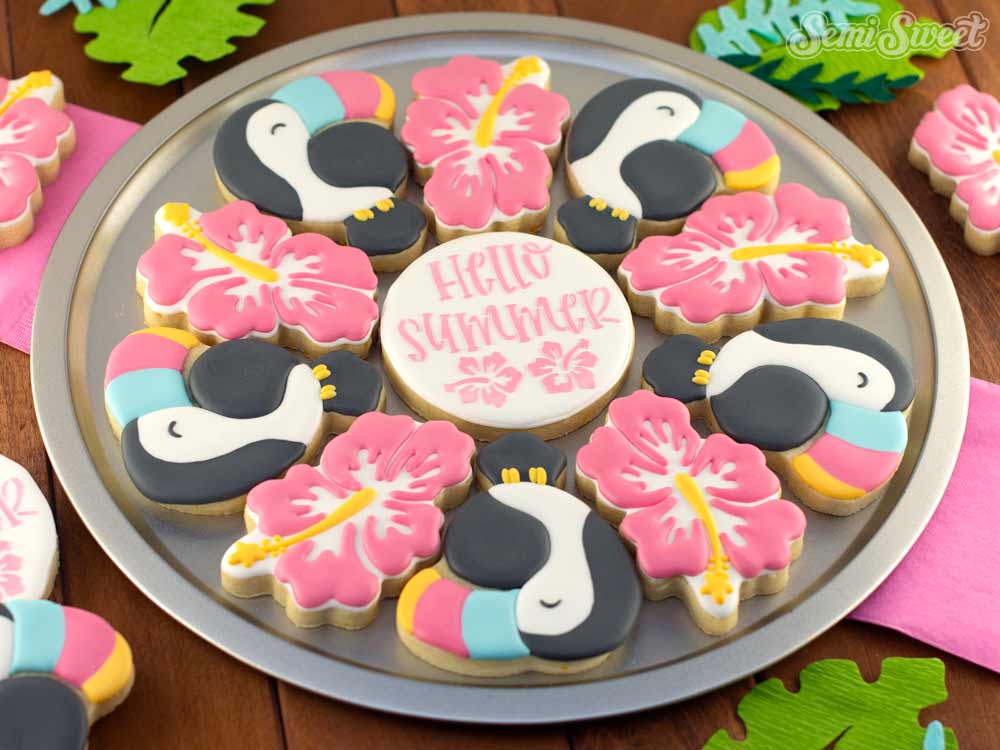
Ready to bring a tropical vibe to your cookie lineup? This Toucan Hibiscus Cookie Platter is a bright, cheerful way to kick off the summer season. In this step-by-step tutorial, I’ll show you how to decorate each cookie in the platter using royal icing, from the bold toucan to the vibrant hibiscus flower, all tied together with a cheerful “Hello Summer” stenciled center cookie. All the cookie cutters and stencil used in this set are available in my shop, so you can recreate this platter with ease. Let’s dive in and start decorating!
My Essential Cookie Tools for Cookie Decorating


My Essential Cookie Tools for Baking Cookies


My Essential Baking Tools for Royal Icing


Essential Decorating Tools for Royal Icing

Toucan & Hibiscus Platter Cookie Cutters
This toucan hibiscus cookie platter set includes a toucan cookie cutter, a hibiscus flower cookie cutter, and a center circle cutter. You can purchase cookie cutters together as a 3-piece set, or as a 2-piece cutter set without the center circle.
(This is the same circle cutter used in all my platter sets, like this Hibiscus Cookie Platter, Watermelon Pineapple Cookie Platter, and Flamingo Cookie Platter, etc.)
There are two sizes available. When arranged as a platter, as shown in the example picture, the platter measures:
LARGE- 12 inches in diameter.
SMALL- 9 inches in diameter.
For this tutorial, I'll be decorating the large size.

Template for the Toucan Hibiscus Platter Cookie Set
To help with the decorating process, I made a PDF template for this toucan cookie platter set design.
Click the link below for the downloadable template PDF file.
This file is rather large in data size. Just a warning, it might take a moment before the file opens in your browser.
If you have a Kopykake or Pico projector, just print it out (or pull it up on your mobile device) and you are good to go. For those without a projector, follow the suggested steps below by tracing the design onto the cookie with an edible food marker.
The Cookie Decorating Process
Decorating cookies always starts with a good royal icing recipe. This is my go-to royal icing recipe that I love using.
For this toucan & hibiscus cookie platter, you will need the following suggested colors:
- Pink icing (I used Americolor Deep Pink.)
- White icing (I used Americolor Bright White.)
- Black icing (I used Americolor Super Black.)
- Teal Blue icing (I used Americolor Sky Blue.)
- Yellow icing (I mixed Americolor Egg Yellow.)
Step 1
For the toucan cookie, begin filling the body section with black icing first then quickly adding the white icing. Shake the cookie to smooth the two colors together. Let this icing set for about 20 minutes.
Then add the beak and tail sections. Add the different colors of the beak one right after the other. Shake the cookie to smooth out the colored icings together.

Step 2
Next, fill in the wing section with black icing. Also, add one of the set of toes with yellow icing.
Then add the smiling eye detail and the other toe set.


Step 3
For the hibiscus cookies, begin by first flooding the entire cookie with white icing. Let this icing crust over (about 30 minutes).

Step 4
Because the leaf details are kind of intricate, I like to use a projector to help me with the shape and placement of them. I first filled in every other leaf, as shown below.

Step 5
Once those leaf sections had time to set, add the remaining two leaf sections.

Step 6
Finish the hibiscus cookie by adding the center stem detail with yellow icing, as shown below.


Step 7
For the center circle cookie, flood the entire cookie with white icing. Let this icing dry complete overnight.
To add the message, I used the Hello Summer cookie stencil in our shop. I swiped stiff pink icing over it to apply the message design.

Toucan Hibiscus Cookie Platter Video Tutorial
The steps above are summarized in the time-lapsed video below.
Here is the completed summer toucan cookie platter all assembled. To create this entire platter required 11 cookies-- 5 toucan cookies, 5 hibiscus flower cookies, and 1 center circle cookie.

This is the large, 12" version. For the tray it's on, I like to use the 12" pizza pans from Dollar Tree. They are cheap and sturdy for transporting around.
I hope this tutorial helped you feel confident decorating your own Toucan Hibiscus Cookie Platter! Whether you're creating it for fun or as part of your summer menu, this set is sure to brighten anyone’s day. Be sure to visit our shop to grab the cutters and stencil used in this tutorial—and while you're there, check out our full collection of summer-themed cookie cutters and cookie stencils to keep the seasonal creativity going!
Add Vibrant Colors with Americolor Food Coloring

To make your decorated cookies pop, use Americolor Food Coloring for bold, consistent colors. It’s my go-to brand for achieving vibrant shades without altering the consistency of the royal icing.
Buy NowTags:
You may also like...


Mike Tamplin
Hi, I’m Mike, the cookie decorator behind Semi Sweet Designs! Since 2011, I’ve been sharing recipes, tips, and tutorials to help beginners gain confidence and give experts fresh inspiration. Along with my brother, Billy, we design and offer hundreds of cookie cutters, stencils, and apparel—all made with decorators in mind.
Whether you're just starting or a seasoned pro, we’re here to make cookie decorating easier and more fun!
Read more


